Jewelry USB Drives: How the Housing Is Assembled
A jewelry USB drive is a standard flash module inside a decorative housing, and almost every return on this product comes from the housing rather than the chip. Stones fall out, the cap stops holding, or the decorated body grows past the plug outline and the drive will not enter a port. Assembly is where those three failures are decided, and the decisions are made long before the stones are glued.
Three Housing Types and What They Hide
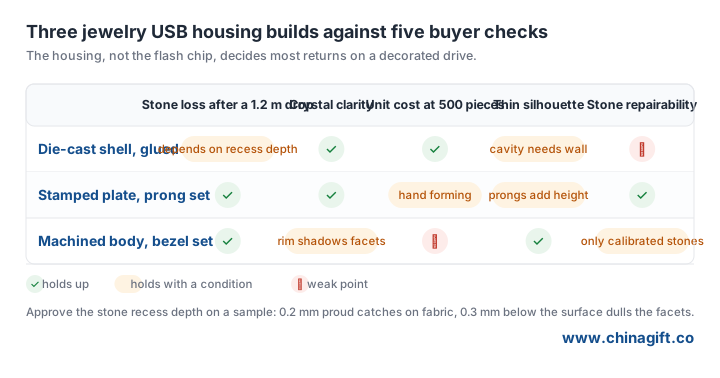
The first is a die-cast metal shell with a hollow cavity: the body is cast or stamped in two halves, the PCB sits in the cavity, and the decoration is applied to the outside. It is the most common construction for crystal-covered bodies because the cavity gives room for the flash module and the outer wall can carry a dense stone layout.
The second is a stamped base plate with the jewelry work built on top, usually with a separate cap that carries the logo. Weight is lower and the silhouette can be thinner, but the plate has to be stiff enough that the stones do not shear off when the cap is pulled.
The third is a machined metal body with a bezel-set stone or a single inset crystal. It reads as the most expensive option, and it hides the least: the machining tolerance shows at the joint, so a 0.1 mm mismatch between body and cap is visible at arm length.
Setting the Stones: Prong, Bezel and Glue
Glue-set stones sit in a drilled recess and are fixed with two-part epoxy or UV adhesive. Epoxy needs roughly 24 hours to reach handling strength and holds better on metal; UV adhesive cures in seconds under a lamp and speeds up the line, but it yellows under sunlight and loses grip on a polished surface. For a gift item that will sit in a drawer, UV is fine. For a drive that travels in a bag, epoxy is the safer call.
Prong setting folds metal over the stone edge and needs no adhesive, so a stone can be replaced. It costs more per piece because the prongs are formed by hand or in a dedicated die, and on a small drive the prongs add height that can catch on a pocket lining.
Bezel setting wraps a metal rim around the stone. It is the most secure of the three and the flattest, which matters on a cap that has to slide into a pocket. The limitation is stone shape: a bezel needs a calibrated stone, so unusual cuts push the design back to prong or glue.
Whichever method is used, the stone recess depth is the number to approve. A stone set 0.2 mm proud of the surface catches on fabric and lifts; set 0.3 mm below, it looks dull because the rim shadows the facets.
Holding the PCB Inside
The flash module is either screwed to a boss in the shell or bonded with a structural adhesive. Screws are serviceable and predictable, but they need wall thickness, which is why thin jewelry bodies are usually bonded. The failure to watch is connector torque: when the drive is inserted at an angle, the plug transfers a bending load into the joint between PCB and shell, and a bonded joint with too little surface area cracks at the edge.
Ask for the retention method in writing, then test it the way a customer will use it. Hold the body and push the plug into a port with the body at 15 to 20 degrees off axis, ten times. A bonded module that moves inside the shell will show a hairline crack in the adhesive at the corner.

Drop and Pull Tests That Predict Returns
Drop the assembled drive from 1.2 m onto a hard tile floor, six times, rotating so each face lands once. Count stones lost and check the cap retention after each drop. A drive that loses a stone on the first drop has a recess or adhesive problem that will repeat across the run, not a one-off defect.
Then test the cap. Magnetic caps should hold with a pull force in the range of roughly 1.5 to 3 N: enough that the cap does not fall off in a bag, light enough that a person can open it without a fingernail. Screw caps should engage in under two turns; more than that and buyers complain the drive is fiddly.
Finally, check the plug outline. The USB-A plug is a fixed 12 mm wide, and any decoration that extends past the metal shell will stop the drive entering a recessed port. Measure the decorated body at its widest point against a real laptop port, not a drawing.
What to Put on the Spec Sheet
Five lines cover the housing: construction type, setting method, stone recess depth, PCB retention method, and the widest decorated dimension. Add the plating or finish for the metal, because a crystal body is usually inspected against the finish as much as the stones.
Beyond that, state the cap type and its pull force or thread count. Cap complaints are the most common after-sales issue on jewelry drives, and they are almost always traceable to a magnet grade or a thread tolerance that was never specified.
Then agree the inspection sample size. For a crystal body, checking every piece for stone loss is realistic on a 500-piece run and takes seconds per unit with a light table. Write that into the order so the check happens before packing rather than after the first complaint.
Browse the jewelry USB flash drive range for housing shapes and setting styles, then send your stone layout and target quantity for an assembly recommendation.
Request a free sample and quote with your housing type, stone specification and cap preference, and we will confirm the setting method that holds your design through a drop test.
Need promotional gifts for your campaign?
Send your brief and quantity for a quote and a digital proof.
Get a free quote


