Conference Bag Spec Sheet: 7 Fields to Lock Before Artwork
Conference bag artwork gets approved late, usually two weeks before the show, and that is the wrong order. Seven fields decide where the print can physically sit on the finished bag, and every one of them is cheaper to change before a designer opens the file than after the screen is burned. Lock them first, then draw.
The workflow below assumes a conference bag programme of 500 to 5,000 pieces for a trade show, a dealer meeting, or a staff welcome kit. The same seven lines apply to a document bag with a zip and to a sling bag, with one substitution noted at the end.
Size: specify the inside, not the outside
Buyers state the outside dimension because that is what the sample measures. What matters is what fits: a conference bag has to take an A4 folder or a catalogue without creasing the corner, plus a bottle, a lanyard and whatever a visitor collects during the day. Give the internal width, height and depth, and give the one test that settles it - a full A4 pad inside, zip closed, corners clear.
The gusset depth is the field that gets rounded down to save fabric. A 10 cm gusset looks generous on a flat pattern and collapses to 7 cm once the bag is loaded and the base sags. If the show is a three-day event with a catalogue, specify 12 cm and a base panel, and the bag will stand in a hotel room instead of flopping over.
Fabric: the denier number and the backing
600D polyester is the standard conference grade because it takes abrasion, holds a screen print and folds into a carton. 210D is lighter and cheaper, and it is what a bag feels like when the show is one day and the budget is tight. Below that, non-woven polypropylene is a give-away material, not a bag people carry twice.
The number the quote usually omits is the backing. A PU coating on the reverse stops a spilled coffee from wicking through the panel and gives the fabric body; an uncoated panel is a sieve with a print on it. Ask for the coating and its weight, and ask whether the inside seams are bound or overlocked, because an unbound seam inside a 600D bag will fray within a week of use.
Pockets and zip: count them, then place them
Three pockets cover almost every conference requirement: one main compartment, one flat front slip pocket for a programme, and one side pocket sized to a 500 ml bottle. Each one adds a seam and a piece of labour, and each one is only worth it if the size is written down. A front pocket specified as "A4" that actually measures 20 cm wide takes a folded programme and nothing else.
Place them against the print, not against the bag. A front pocket that runs to the top edge leaves no clean panel for a logo, and a pocket seam through the middle of a print area is the most common artwork rejection at sampling. Draw the pocket outline on the flat pattern and mark the print area inside what remains.
The zip follows the pocket layout, because both are cut from the same panel. It should open at least 4 cm wider than the bag's internal width so the mouth stands open while someone reaches in. Specify the gauge, the slider type, and whether it is a two-way zip; on a bag opened and closed all day, a two-way slider halves the wear at each end and lets the bag be locked with a small padlock.

If the design uses a flap instead of a zip, the closure field becomes the magnet or the snap, and the print area moves with it. Either way, name the hardware finish in the same line: brushed nickel, matte black, or antique brass. Unnamed hardware is whatever the factory has in stock that week, and the second production run will not match the first.
Strap: width, range, and the anchor
A shoulder strap is specified by webbing width, adjustable length range and attachment. 25 mm webbing is the light-bag default; 38 mm spreads the load on a bag carrying a catalogue and a laptop and reads as a more expensive product. Give the range as a minimum and maximum, measured on the strap, not on the bag.
The anchor decides whether the strap survives. A bar-tacked box-X through a reinforced patch holds; a single row of stitching into the top binding pulls out, usually at the corner where the bag is grabbed one-handed. On a sling bag the substitution is the same field with a different name: the single diagonal strap's anchor and its buckle position across the chest.
Print area: measure it on the sewn bag
Artwork is drawn on a flat blank, and the bag a visitor receives is not flat. Seam allowance, the zip tape, the pocket edge and the curve of a loaded panel all eat into the printable rectangle. Ask the factory for the print area as four dimensions on the finished bag, and ask for a photo of a sewn sample with the area marked in tape.
Two more numbers belong in the same line: the bleed and the number of print positions. A screen that runs to the seam will show a sliver of unprinted fabric when the bag is loaded, and a design that needs front and back is two screens, two setups and two passes, not one print "on both sides".
Packing: the field that decides your show logistics
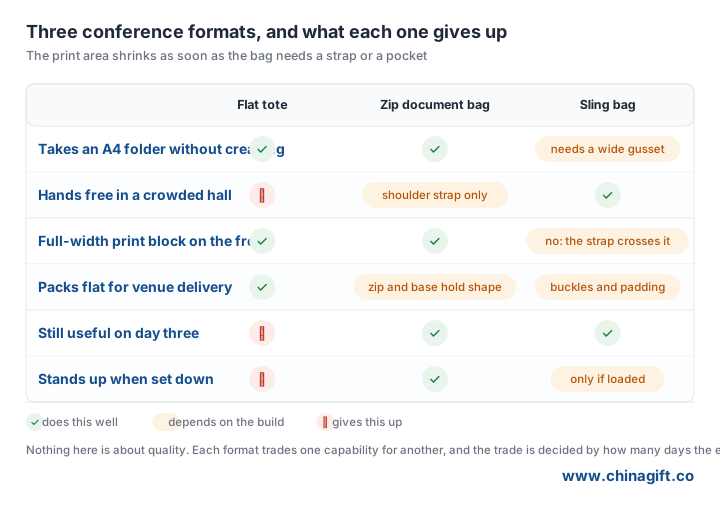
Conference bags are usually shipped to a venue or a hotel, not to a warehouse, so the carton is part of the design. Specify pieces per carton, a carton weight one person can lift, and whether bags are nested flat or individually polybagged. Flat-nested bags save volume and arrive creased; polybagged bags arrive clean and take roughly twice the space.
Send the seven fields as a single table before the artwork brief, and ask the factory to return the print area and the packing count filled in. A designer who receives a dimensioned print rectangle produces a file that passes sampling first time.
Need promotional gifts for your campaign?
Send your brief and quantity for a quote and a digital proof.
Get a free quote


