Bottle Opener Engraving Depth: Laser vs Etch
Two suppliers quote a laser logo on the same stainless bottle opener and the marks arrive at different depths. One can be felt with a fingernail and survives a dishwasher; the other looks correct in a photograph and fades within a season of bar use. The word engraving was doing different work in the two quotes, and depth is the number that separates them.
What engraving depth means in a quote
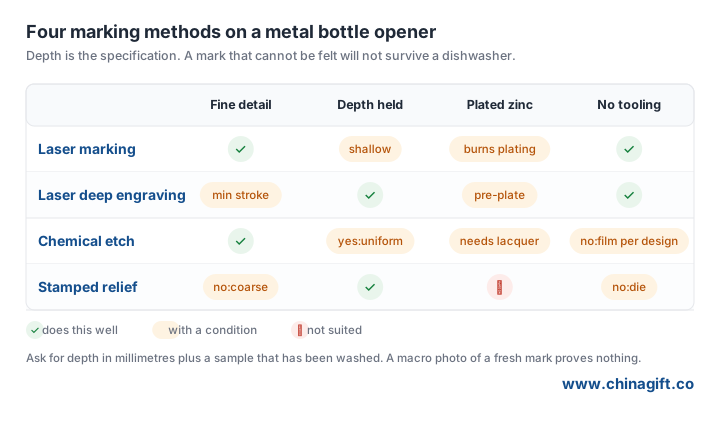
Three processes get called engraving. Laser marking runs at low power, melts or oxidises the surface and leaves a dark mark with almost no relief. Laser deep engraving makes several passes and removes metal, producing a recess you can feel. Chemical etching masks the design with a photoresist film and attacks the exposed metal with acid, giving an even recessed pattern across the whole design. Stamping and casting sit alongside these: a die strikes the relief in one hit, and a mould forms it during casting. Each one produces a different depth range and a different cost structure, and a quote that says laser engraved without a depth figure has not chosen between them.
Depth matters for three reasons on a bottle opener specifically. The tool is used against metal caps, so the marked area takes abrasion that a pendant never sees. It usually goes into a dishwasher, where heat, detergent and long wet cycles attack thin coatings. And the mark often carries the entire brand impression on a small object handled at arm length, so legibility matters more than on a large surface.
Laser on stainless: what depth you actually get
A fibre laser marking stainless steel removes a small amount of material per pass. One pass gives a shallow mark measured in hundredths of a millimetre; several passes with slower speed and higher power build a recess deep enough to feel, and the operator controls that by the number of passes rather than by a single setting. Ask for the pass count and the measured depth, because a sample that looks dark may simply be marked, not engraved.

Minimum stroke width is the other laser number that decides legibility. Thin strokes below roughly a quarter of a millimetre start to break up or fill in depending on the focus and the material, so a logo with hairline details needs redrawing for the process rather than shrinking. On a curved body the beam goes out of focus as the surface falls away, which is why a flat opener holds a consistent depth and a curved handle does not unless the machine has a rotary axis.
Laser on plated zinc alloy: the plating problem
Die-cast zinc openers are almost always plated, usually nickel then chrome or a coloured finish. Laser through that plating burns the coating away and exposes the zinc alloy underneath, which oxidises and can pit, especially in a dishwasher. The mark looks acceptable at inspection and develops white spotting or a dull patch weeks later, and the customer reads it as a cheap product rather than a process decision.
There are three honest ways to handle it. Engrave the raw casting before plating, so the recess is plated along with the body. Laser at settings that mark the plating without breaking through. Or engrave after plating and seal the recess with a lacquer, which works if the lacquer is specified and tested rather than assumed. A supplier who offers laser on plated zinc without mentioning any of the three is a supplier who has not thought about it, and the failure will appear in the field rather than in the sample.
Chemical etching: even depth across the design
Etching produces a matte recess with a depth that is uniform across the whole pattern, which is what you want for a large logo or a repeating motif. The limitation is tooling: each design needs a photoresist film or mask, so there is a one-off cost per artwork and per size, and small runs carry that cost per piece. Fine detail holds well because the mask is photographic, and the process does not care about curved surfaces in the same way a laser does, provided the part can be immersed.
The economics are straightforward. Below a few hundred pieces, laser wins because there is no tooling. Above that, etching often wins on unit cost for a large area, and it wins on consistency when the design covers most of the face. A mixed order, one logo on 5,000 pieces plus individual names on 200 of them, usually means etching the logo and laser marking the names.
Reading a sample in three checks
First, feel it. Run a fingernail across the edge of the mark; if it catches, there is relief. Then measure. A depth gauge with a fine probe, or a micrometer reading across a masked step, gives a number in millimetres, and that number should appear on the specification rather than in a conversation. Second, wash it. Put the sample through a dishwasher cycle, or through a hot water and detergent soak, and compare with an unwashed sample from the same batch. Marks that fade after one cycle are marks that were never deep enough for the product. Third, look for corrosion. On plated parts, inspect the recess edge for discolouration a few days after the wash, because plating damage shows up late.
A macro photograph of a fresh mark proves the artwork was received. It says nothing about depth, nothing about coating integrity and nothing about what the opener will look like after a month behind a bar.
Matching the method to the order
Choose laser marking for small logos on stainless at low volume, for individual names and dates, and for orders where the artwork is likely to change. Choose laser deep engraving when the mark has to be felt and has to survive abrasion, and budget for the pass time. Choose etching for large designs at volume, especially where the pattern covers a wide area and depth consistency matters more than relief. Avoid laser through plated zinc without a stated plan for the exposed alloy.
Send the artwork, the base material and whether the opener is plated, and we will confirm which method holds the depth you need and quote the tooling or pass time that comes with it.
Need promotional gifts for your campaign?
Send your brief and quantity for a quote and a digital proof.
Get a free quote


